
Originally Web posted Saturday, 15 May 2004
Content last modified
Saturday, 9 January 2021
It helps to have a steady hand and keen eyesight.
The Zip 250 USB external drive suddenly ceased correct operation on the client’s system. The client immediately noticed excessively loud clicking, for a few seconds, upon disk insertion. The client reported that this unit was a replacement sent by Iomega to cure the same problem, which happened with his original Zip 250 USB external while under warranty (several years earlier).
Routine software and hardware troubleshooting was undertaken. All relevant troubleshooting suggestions on the Iomega website were followed. The failure was consistent with different computers, and with the drive not attached to a computer. The Zip disks operated correctly in other Zip drives. The Zip drive power supply was meeting specifications while powering the drive (both at idle and operating).
Having become highly disenchanted with the poor reliability of the Zip format, the client is abandoning the format, and converting to CD-RW. Permission was granted by the client for me to do as i wished with the dead drive. I chose to attempt to get it to work one last time, to recover some of the client’s backed-up data, and as a learning experience.
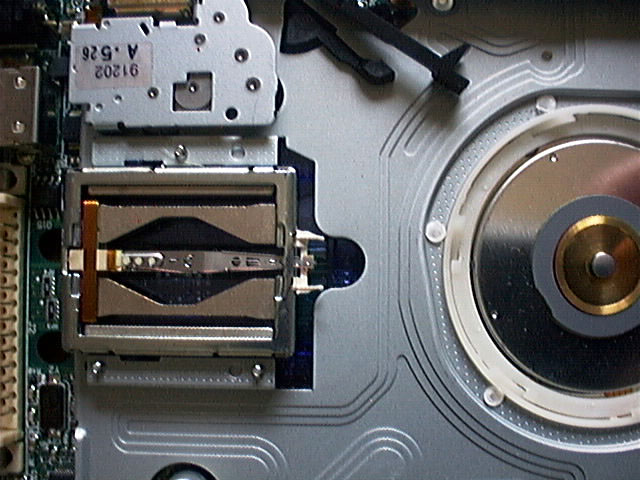
With cosmetic and physical integrity no longer being of concern (and possibly having missed some essential clues discussed below), i literally ripped the drive apart to gain access to the interior. This should not be necessary for your repairs, nor for future repairs which i may undertake. After hours and hours of disassembly/reassembly over and over, trying different experiments with each of the electrical contact and mechanical subsystems, i noticed that the head assembly did not seem to be allowed to move freely to and from its rest position under all circumstances. More experiments ensued. More time passed. After disabling the head return and locking mechanical mechanism, yet still finding the head assembly unable to consistently move freely over its whole range, i finally found the source of the problem: bent plastic guide pieces (white on the unit i fixed) interfering with the free movement of the head assembly. Here is a top-view, drive disassembled, picture of the situation:
Note that the photo above is a simulation, with the already-straightened guides digitally “re-bent”. No actual “before” photos exist because i had no way of knowing what the final fix would be until i had already performed the repair and tested the drive.
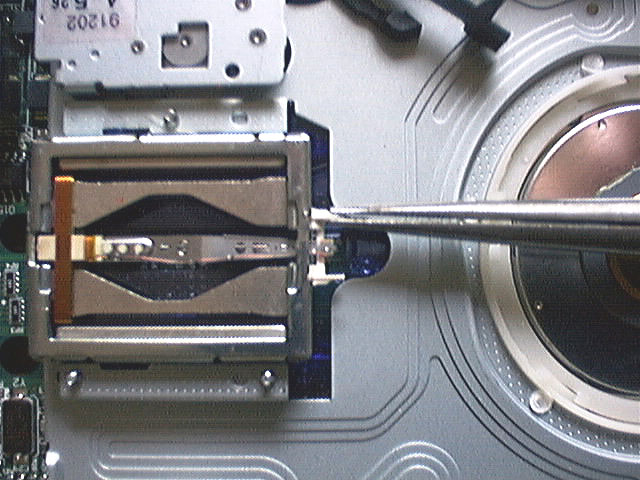
Those not wishing to destroy the physical and cosmetic integrity of their drives will do well to heed the wisdom of correspondent John Palmer, who notes that his drive (and i gather many?/most?/all? others) has 4 pinholes, on the sides of the case about 1 cm from each corner. The mere act of inserting a point (pin, maybe a small paper clip, or something like a propelling pencil metal point as John used) will release the latch and allow the cover to come off (probably with some wiggling) once all 4 are released. This will allow for a somewhat easier repair than the method this page formerly recommended, though there remains the issue of the spot-welded metal cover, which may still require access from the front. (John reports that the drive he dealt with had no inner metal shield, allowing access exactly as shown in the photo above.) If is going to remain in place, you’ll likely still need to do most or all the work through the disk slot in order to get a straight shot at the head assembly. Access and lighting will be difficult. Here is a view from close to the perspective you will actually see, except with much better access and lighting due to this drive already being disassembled:
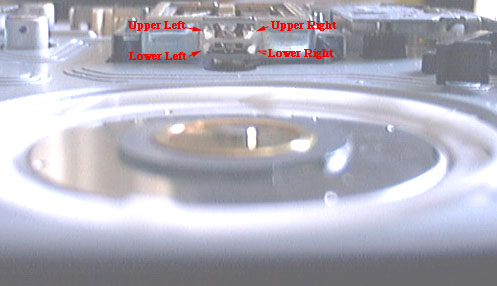
There are four (white) plastic stationary “tongs”, arranged two vertically on each side of the movable portion of the head assembly, forming a rectangle of points towards the disk slot. The movable portion of the head assembly has a (white) plastic cylindrical “bar” in a horizontal orientation. Each end of this bar rests in the middle of the vertical tongs on both sides of the head assembly.
In the failure i saw, simulated in the pictures above, several of the tong ends were bent in such a way that they curved inward, towards each other and towards the movable part of the head assembly. There may also have been a vertical component to the bend. One or more of these bent tongs were precluding the free movement of the head assembly, by catching on the horizontal cylinder as the head moved from its rest position towards the spinning Zip disk. As the head broke free of the bent tongs and overshot its intended location, a clicking sound was produced. Since the head normally moves in and out of the rest position several times when first reading a disk, there are several clicks.
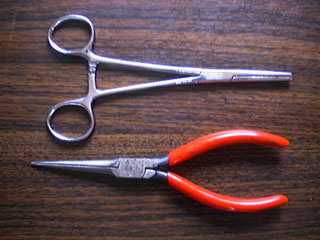
Any or all of the four tongs that fail to point straight out from the head assembly towards the drive’s disk slot will need to be bent back into their proper position. Since i had already destroyed the drive top sheet metal cover (which is spot-welded), i had free and easy access with conventional miniature long-nose pliers. Those of us wishing to effect this repair without opening the case will need to use something with a much longer reach, such as needle-nose pliers or hemostats:
Here are my recommended steps:
When you are finished, none of the four tongs should visibly curve, either vertically or horizontally. They should look something like this:
Note that several of the tongs in the photos above still curve noticeably. The most ideal tong in this photo is the one on the upper left. This drive operates in this condition, yet i would not want to warrant its continued operation!
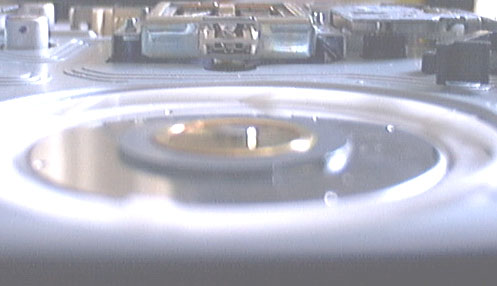
I don’t know. I did notice that two of the client’s Zip 250 disks had stiff shutters. Notice in the photo below how relatively close the shutter of the disk and the tongs approach each other:
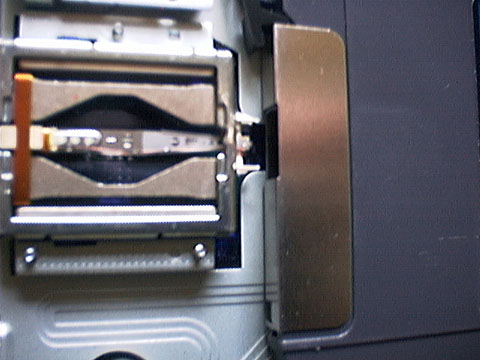
In this photo, clearance is no problem. However, there may be certain conditions with certain disks (which i could not reproduce) where the tongs and shutter, or other parts of the disk, come into contact. Perhaps the disk insertion is too sudden, deep, or violent. Perhaps there are problems with Zip disks that tend to lead to the tongs getting bent, no matter how the disk is inserted. Maybe someone decided to try putting a standard 3.5" floppy in there.
Whatever the cause, straightening bent tongs appears to be at least one solution to at least one flavor of Zip drive failure. Hopefully it will help someone fix a drive without having to dismantle it (at least not the spot-welded top metal cover).
![]() World O’ Apple & Macintosh
World O’ Apple & Macintosh
![]() The Sonically Pure Pages
The Sonically Pure Pages
This Siber-Sonically Pure Page is ![]() and
and ![]() Transitional compliant.
Transitional compliant.