Crapsman Craftsman Model 47711 Torque Wrench
Repair, Calibration, and General Findings

It could have been a great tool: an affordable, good-quality torque wrench for the home mechanic. Maybe for some people, it is exactly that. Judging from both my own experience and things i’ve read over the years online, for all too many of us, it simply isn’t that. For us, it is an unreliable, untrustworthy headache and apparent waste of money. I’m delighted that the wrench is Made In U.S.A., yet if this is typical of what has become of U.S. manufacturing, i’m even less surprised that my nation is in the proverbial toilet.
In case anyone wanders by who does not already have this tool, we’re talking about a 3/8" drive electronic digital torque wrench, sold by Sears under its Craftsman brand, made by the Danaher company of Alpharetta, Georgia (U.S.A.). It has a range of 10-100 ft.-lbs., a.k.a. 1200 to 2400 inch-lbs., a.k.a. 135.6 to 271.2 N·m. (That last bit makes it double-extra clear that this tool was designed as well as made in the U.S.A., my birth nation and home of stupid units of measure.)
Mine was out of service for several years, until i worked out a plan to get my wrench working again, and successfully executed it. If you haven’t yet sold/destroyed/blown up yours, maybe the information on this page can help you return yours to operational status as well.
Important: Do Not Do Not Do NOT attempt to reset the 47711 Digital Torque Wrench by randomly or purposefully pushing its buttons in various undocumented combinations! You stand a good chance of getting it into Calibration mode, which deletes the factory calibration information, permanently (as far as i can tell)! If you do this (or you’ve already done this [suckah]), not only will you have to fix the torque wrench, you’ll have to recalibrate it too (woe is you)! It would be kind of you not to ask how i know this (though it is probably rather obvious).
Electrical/Electronic Problems and Repairs
Problem: Shuts off by itself, too soon
Symptom Details
You’re attempting to use the wrench, but it shuts itself off before you're done, or maybe even before you start. You’ve tried countless brand-new fresh batteries, to no avail.
Cause
Intermittent connection(s) on flex cable at the P.C.B. connector.Repair
Clean the connector. Details below.Problem: Eats batteries
Symptom Details
You’ve tried countless brand-new fresh batteries, yet within no time they’re dead, even if you’re not using the wrench. If you’re “lucky” like me, you may accidentally discover in the dark of night that the display of your Craftsman 47711 Digital Electronic Torque Wrench is turning itself on and off, without your touching it!
Cause
Intermittent connection(s) on flex cable at the P.C.B. connector.Repair
Clean the connector. Details below.Problem: Any other strange electrical/electronic problem, especially intermittent ones
Symptom Details
I’ve lost track of all the various bizarre things i’ve seen the display on my 47711 tell me.
Cause
Intermittent connection(s) on flex cable at the P.C.B. connector. This cable connects the pushbuttons to the circuit board. Intermittent connections can make it seem to the circuitry that the buttons are being pressed (or not pressed) in unusual combinations and at unusual times.Repair
Clean the connector. Details in the next section.Repair: Clean the Flex Cable Connection
So far, i’ve found that this one act has cured all of the various symptoms of misbehavior that my wrench has exhibited.
Disassembly
Can’t clean it if one can’t get to it.- Remove the one silver-colored #1 Philips head screw next to the printed text on the red plastic body. There is no need to remove any other screws.
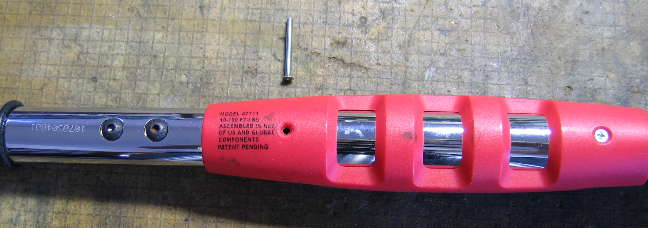 I’ve removed the other silver Philips head screw (twice) by accident, and nothing particularly bad happens (nothing mysterious falls out/apart)… it just doesn’t help at all with the contact cleaning process. It allows the red plastic to come off, and we don’t need that.
 - Lift the black plastic display and button assembly on the front at the end closest to the socket head.
- Slide the black plastic assembly slightly towards the socket head. This releases the latch tab which holds the handle end of the black plastic assembly firmly to the red plastic.
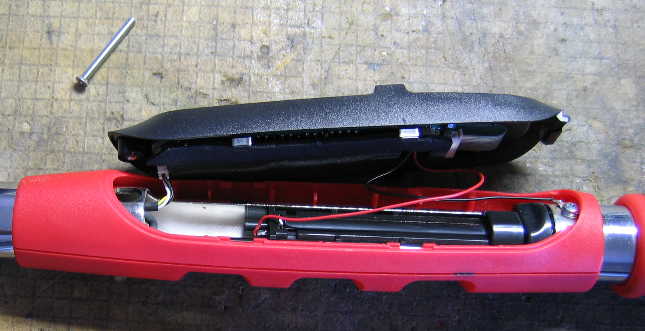
- Carefully unplug the small 4-pin white plastic connector which connects the sensors to the circuit board. The connector is friction-fit and pulls “straight” out along the axis of its attached wires.
Clean the Flex Connector/Cable Contacts
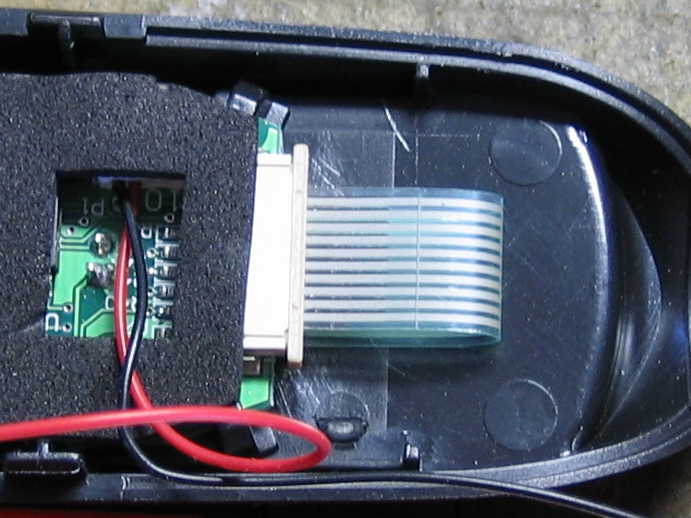
The electronics assembly is now held to the rest of the tool only by the two battery wires (red and black). It should now be possible to get a better view of the back side:

The flex cable is held into its connector by force, which is released by unlocking the connector.
- Unlock the connector by gently prying each of the two ends of the locking tab:
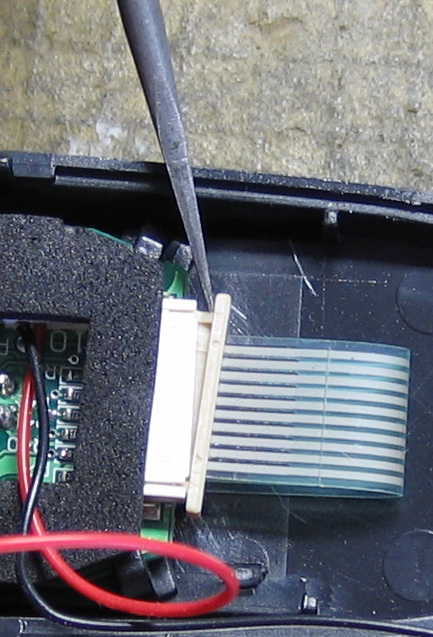
- Gently pull out the flex cable. If it does not basically “fall out” with almost no force, the locking tab is probably not fully unlocked. Gently try prying its ends slightly further from the connector main body. If it does not want to move, leave it alone… don’t force it. If you’re not an electronics person and are having trouble, find a skilled electronics person to help you. It is very easy to permanently damage the flex cable and/or its mating connector, rendering the torque wrench permanent junk (or at least much farther into nonsensically expensive to repair).
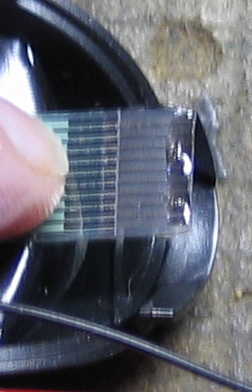
- Straighten out the flex cable, which will flip its end over, revealing the (one) side with the active contacts.
- Wipe the contact surfaces with a dry cotton swab.
- Apply a small amount of Caig DeoxIT Red, or another very high quality electrical contact cleaning liquid. If necessary, spread it around with a toothpick or somesuch:
- Insert and remove the flex cable into/out of its mating connector 2 or 3 times. No need to lock it in with the locking tab, yet.
- Wipe off the excess cleaning liquid with another dry, clean cotton swab.
- Repeat the last 3 steps, except use Caig DeoxIT Gold, or whatever follow-up electrical cleaning liquid you prefer. If you used a one-step liquid (which quite likely won’t work long-term, and may not work short-term), skip this (these extra 3) step(s).
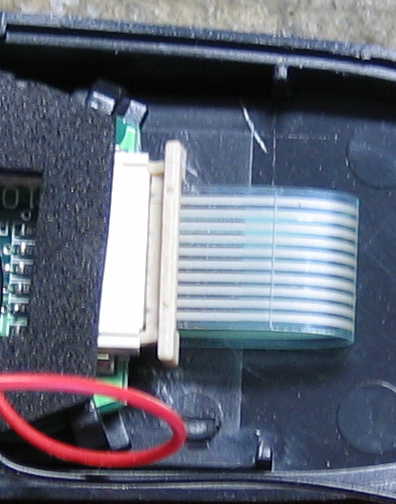
- Carefully plug the flex cable back into its connector, one final time. Be sure it is seated all the way. Lock the cable in place by pushing the locking tab back in (at both ends) so it is seated completely on the main connector plastic body:
- Test by gently pulling on the flex cable, as if you’re trying to pull it out of the connector. It should not move with a gentle pull. If it does, repeat the previous step and/or seek other help/information.
- Reassemble the wrench, reversing the disassembly instructions. You may wish to only reconnect the sensor plug and test the electronics for basic functionality before fully reassembling the tool.
Note: I am not certain that the two Caig DeoxIT products are truly the very best chemicals for this particular job. The flex cable on mine seems to have (had) some sort of dark coating on the contacts… carbon? Oxidation? Something else? I made no attempt to even perform an up-close visual inspection, much less any sort of chemical analysis. It is possible that some other chemical(s) may work better. My initial cleaning did not hold up… i had to re-do it about a year (or two?) later. The same sort of bizarre intermittent symptoms had reoccurred.
Caution: site correspondent Mark B. notes that these contacts are non-metallic, and at high risk of being wiped away by chemicals such as alcohol or a Freon®-based contact cleaner (possibly with vigorous rubbing added). Choose your contact cleaner and application methods carefully!
Test it!
Put in a(nother?) fresh set of 3 AAA batteries and find out whether the repair has been successful. If you (or someone “helping” you) were wildly pushing buttons and even once saw CAL or L 0 in the display, you’re not done yet: you’ll need to recalibrate the wrench before it will work. If you were good and didn’t wildly stomp on various buttons, and never saw CAL nor L 0 (nor L with any other number), your wrench should still be holding its factory calibration and it should Just Work™. You should be able to turn it on and see the usual display (a couple of flashing changes, then Target ft-lb 100.0 and the battery icon). The display backlight should stay on for its usual default time, and the wrench itself should stay on for its normal reasonable period of time (which i didn’t measure). You should be able to torque it in a vise or on a very tight bolt or whatnot and see that both the numeric display and the discrete LEDs are operating as expected. Everything should be operating as expected.
If you do not see normal operation, and you are certain your batteries are OK (or like me you made a “fake” battery out of a wood dowel with a screw and wire at the positive tip end, and attached a regulated 4.5V DC power supply to guarantee a good battery for as long as you want), it is entirely possible that your particular wrench has a failure which is not related to the flex cable contacts. Unless someone contacts me with additional information on other failures and successful repairs and allows me to post the information here, this page is unlikely to be able to help you further. I do not recommend going through the calibration procedure unnecessarily, unless you happen to be equipped with/have access to some sort of safe, effective torque wrench calibration arrangement.
Calibration
Long before i figured out that there might be an internal electrical problem, well before i thought about opening the wrench up, i somehow convinced myself that “playing” with the various buttons on the 47711 wrench would somehow “clear” or “reset” it and it would resume working as a usable tool. Just to be totally clear: Nope. There is no button reset that will help with problems. The only reset that might help is removing the batteries, leaving them out at least a minute or two, then putting them (or new, fresh ones) back in.
But i had not figured that out. I wasn’t getting anywhere with my button playing. My True Love decided to give it a try. She was able to get it into Calibration mode, by pressing and holding the PWR and UNIT buttons at the same time, until CAL appeared in the display, followed by L 0. I was delighted, at first… it looked like the wrench was again working! I turned it off, waited a few seconds, then turned it back on again. It did not start up with the normal display and very swiftly shut itself off again.
I proceeded to open up the wrench and figure out the contact cleaning, described in detail above. Hopeful, upon completion of the cleaning, i again tested the wrench: same brief all-zero display, same quick auto shutoff. Torquing the wrench produced no reading on the digital display and no LED indications. I soon realized that the factory calibration had been erased!
I scoured the WWW and a few other crannies of the Internet for calibration information. I looked into the cost of official service from Sears and/or Danaher. Once the coughing/fainting from the ridiculously high prices/short guarantees had subsided, i continued to research. I didn’t find anything specifically for this tool, though i did find quite a bit of information for other digital electronic torque wrenches. Between studying all those, and playing around with my wrench (after the contact cleaning), i was able to synthesize a calibration procedure to try out. It worked! Here it is:
Craftsman 47711 Digital Torque Wrench Calibration Procedure
- Press and hold PWR + UNIT until CAL appears, then release buttons. Display will show:
L 0 - Load wrench 3 times clockwise to full scale: 100 ft.-lbs. Remove all torque load.
- Press UNIT to lock in zero torque (actually: squeeze button and bar so it is not additionally torqued). Display will show:
L 20 - Load to 20 ft.-lbs., clockwise. When stable and holding at 20 ft.-lbs., press UNIT to lock in. Display will show:
L 60 - Load to 60 ft.-lbs., clockwise. When stable and holding at 60 ft.-lbs., press UNIT to lock in. Display will show:
L 100 - Load to 100 ft.-lbs., clockwise. When stable and holding at 100 ft.-lbs., press UNIT to lock in. Display will show:
L 0 ccw
Time to do the exact same procedure, in the other direction. - Load wrench 3 times counterclockwise to full scale: 100 ft.-lbs. Remove all torque load.
- Press UNIT to lock in zero torque. Display will show:
L 20 ccw - Load to 20 ft.-lbs., counterclockwise. Press UNIT to lock in. Display will show:
L 60 ccw - Load to 60 ft.-lbs., counterclockwise. Press UNIT to lock in. Display will show:
L 100 ccw - Load to 100 ft.-lbs., counterclockwise. Press UNIT to lock in and complete process. Display on mine showed 00.00 (i’m not sure about the placement of the decimal point—i was too excited that the ****er fine unit was finally working) and ERR.
I powered down the unit, waited maybe half a minute, then powered it back up. It came up with a normal display and the default 100 ft.-lb. preset. I tested it against a Powerbuilt model 940758 Digital Torque Adapter and it agreed sufficiently well enough for my purposes (tough to tell as my hand isn’t steady at holding a precise torque).
Modified Procedure for Craftsman 47712 Torque Wrench (0-200 ft.-lbs.)
Thanks to site correspondent Carlos V., we now have information for calibrating the related model 47712 Craftsman Torque Wrench. Here’s the information, straight from Carlos:
I have a 47712 torque wrench, which needed calibration. I did what you did but, I also needed to press the down arrow to get to the calibration menu.
The unit did display L-0, but the others L-20, L-40, L-70, L-100, are in % of the range. The torque wrench range is 0-200 ft-lbs. If you do the same as you did with 47711 to this one it will work.
Calibration Loads
For me, the biggest problem wasn’t figuring out the calibration steps (though doing so was not trivial). The biggest problem was setting up an ad-hoc calibration loading arrangement. Some of you may be fortunate and either know someone/have access to an actual torque wrench calibration system, or be better outfitted in terms of what you have lying around.
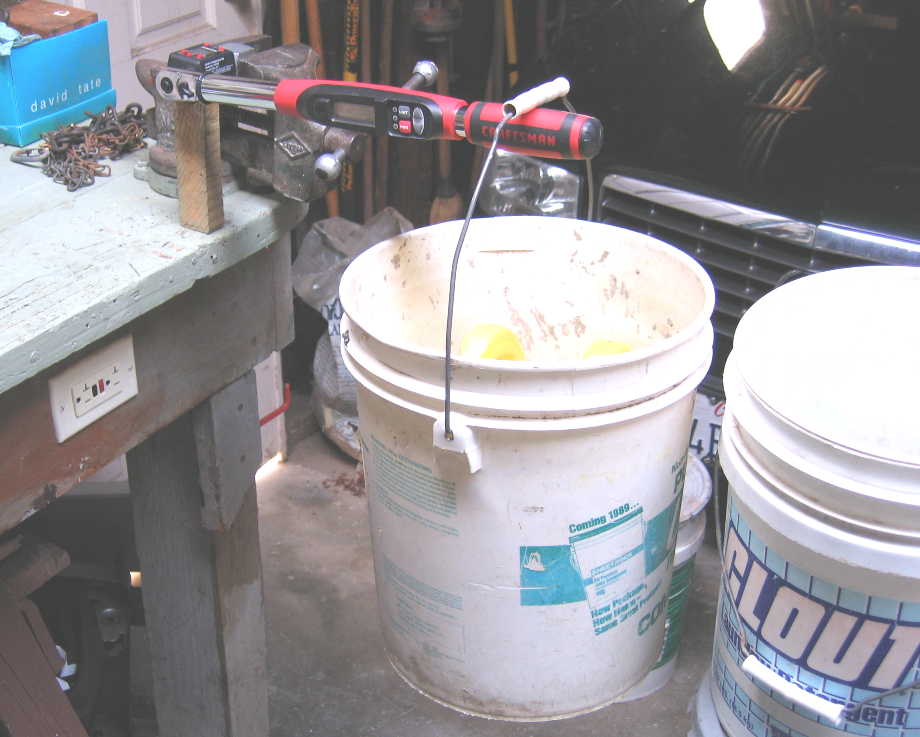
My initial attempt used a lot of math and whatever weights i had lying around: mostly big paint buckets, with and without paint. The ones without paint received items such as bleach bottles or antifreeze bottles or rocks to add mass. For awhile, chains, hooks, and a pulley were involved, to eliminate the error of the mass of the Craftsman torque wrench handle and Earth’s gravity acting upon it (producing a torque force). That arrangement eventually proved unworkably unsafe in my particular garage, due to geometries/misalignments of the bench vise (wrench anchor point), roof rafter (ceiling anchor point for the chain/hook/pulley setup), and perpendicular anchor point (other end of the chain/hook/pulley setup). This basic idea could have worked, had i had available known heavy weights and/or more sturdy and bigger containers.
At one point i realized that i’d need some other means of actually measuring torque or mass or something. At that time, i had not done a successful calibration, and could not be sure that i would be able to do so. I had no way of knowing whether the 47711 would ever operate again. In the process of seeking a torque calibration measuring reference, i came upon the aforementioned Powerbuilt Digital Torque Adapter. This device, a small module with 3/8" (for the model 940758) square socket fittings on each end (male on one, female on the other), was being marketed as both a torque wrench calibration device and an adapter which could convert any ordinary socket handle into a de-facto electronic torque wrench. Seemed eminently worth it to me! The device comes with a nicely machined aluminum square block, for clamping in a vice, for calibration.
Received the torque adapter and ran it through its paces. Once stupid user error was overcome, it proved itself to be fully functional. I attached it to the Craftsman torque wrench, with it being sandwiched between the head of the Craftsman and its included aluminum block, clamped tightly in the bench vise.
I found that the gravity weight of the Craftsman wrench was insufficient to register as a torque when the Powerbuilt was in ft.-lb. mode. Certainly there’s an error being incorporated in the calibration here, yet for my particular setup, it was the only way to go: having the Craftsman handle oriented horizontally and being acted upon by gravity. No pulleys/hooks/chains… just dead weight on the Craftsman handle at a precisely marked reference point (left over from the mathematical calculation scheme).
With the Craftsman wrench in place but off and the Powerbuilt on, i arranged three different paint bucket-based loads, one for each weight calibration point needed by the 47711 wrench. I simply adjusted the load until the torque measured spot-on on the Powerbuilt. At that point, i was able to power up the Craftsman and go through the calibration procedure listed above.
Mechanical Problems and Repairs
Problem: Stripped ratchet head
Repair
Site correspondent Greg V. encountered this problem and expended a great deal of effort (and probably money) resolving it. Here are his findings:
The story is I was torquing down a nut and the ratchet head stripped out on the wrench, seems like it has happened to quite a few people after reading some reviews. Anyways after buying up every single 3/8 drive at Sears to try at matching the ratchet this torque wrench had, I found out you have to buy a 3/8 drive kit Part Number 34875, though it MUST be US made labeled on the box… ask me how I know (haha). Anyways, inside you will find a US made 44808 wrench and the ratchet from the 44808 fits perfectly into the 47711 electronic torque wrench.
Conclusion
It’s been a long journey. Yet at the moment, i not only have my Craftsman 47711 Digital Torque Wrench operational again, as a side benefit i also have the Powerbuilt Digital Torque Adapter as a backup!
If i had it to do all over again in present time, with foreknowledge of the reliability problems with the 47711, i’d likely just have purchased and used the Powerbuilt adapter. It’s not perfect: the decimal point and the arrow on the display are hard to read. It adds a good 6 cm of height or thickness between the wrench head and the socket, which may keep it from fitting in some places where a standard torque wrench could easily fit. Still, so far it has been problem-free and has not eaten its batteries.
How long will either digital electronic torque measuring device last?… only time will tell. If anything significant happens, i’ll endeavor to update this page. If you have anything you’d like to contribute, let me know.
Happy Wrenching! World O’ Automotiveness